Watch the WAC Welding unit demonstation now
WAC Wireless Welder Remote – Operation Manual
- Always ensure the welding unit is powered off before connecting or disconnecting the remote unit
- Plug the welding remote control into the 14-pin Remote Control connector.
- Power up the welding unit and observe the RED light on the receiver unit. The amperage indicator on your welding unit display should show minimum output.
Start or Change Power Output
Please Note: On single turn dials, increments are 2%. On three-turn dials and at half power, increments are 1%. Dials work between 9% and 98% only.
To start or change welder power output, adjust the dial setting to the desired power ( 9 to 98% ) , then press the hand control GREEN button.
- The remote beeps and the LEDs blink once when the button is pressed. The GREEN-ready light on the receiver unit turns on. The welding unit display will change to the requested output percentage. If your hand control is equipped with a LED panel, it will clearly show the dial setting.
- The remote will beep and blink twice to confirm the welding unit received the command at the desired power.
- Now, every time the hand control dial is adjusted, a new signal is sent to the welding unit with a single beep/blink. A double beep/blink will confirm the arrival of the signal.
If the dial has not changed for 20 minutes, the hand control will go into sleep mode but the last value is kept. To make a change, the GREEN button must be pressed again to restart the 20-minute auto-send phase. This saves battery life.
Start or Change Half -Power Output
By pressing the BLACK button instead of the GREEN button, it will reduce the welding unit output to half.
At any time during welding, the unit can be switched between FULL and HALF power by toggling the GREEN and BLACK buttons.
Cut Welder
To stop the welder and reduce its output to a minimum, press the RED button.
The action will be confirmed with a single beep/blink followed by a double beep/blink.
Always press the RED button before shutting down the welding unit
Problems?
If the hand control does not confirm the command (double beep/blink), check if the RED light on the receiver unit is on. If the light is off, try the unit on another welding unit. This will determine if the problem is with the remote or the welding unit.
If the remote does nothing (no LED or beeps) when buttons are pressed, change the batteries and try again. (3 x AAA batteries)
In rare occasions, the address synchronization can be lost and the green light will not come on again. If this happens, with power on, press the button on the outside of the receiver unit simultaneously with the RED button on the hand control. You will get two beeps/blinks and the units are re-synchronized.
NOTE: Alkaline batteries loose 50% power at -20C. We recommend switching to Lithium batteries if working below -20C.
For support contact WAC Welding at 780 464-5538
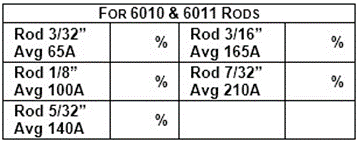
Record calibration for your welding unit:
When you first start using your WAC Remote it is practical to record the starting percentage for each size of welding rod. All you need to do is set the Amperage dial on the welding unit to maximum and then dial the remote until you reach the average amperage for each rod size, then record the percentage from the hand control LED on the label provided.